
Create a Multipurpose Container Using Recycled Plastic Bottle Caps
Translated from Spanish, summarized and contextualized by DistantNews.
At a glance
In-depth
Official statement
Context piece
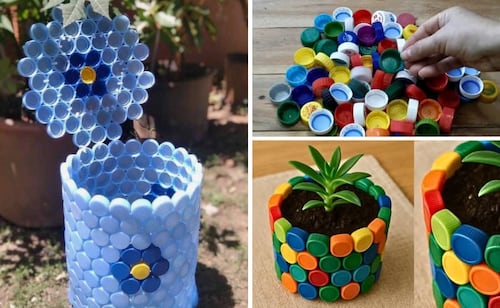
- Accumulating plastic bottle caps offers an opportunity for household-level circular economy practices.
- These caps, often made of durable high-density polyethylene, can be repurposed into rigid containers like laundry baskets or trash bins.
- A step-by-step guide details how to create these containers using approximately 100-200 caps, hot glue, and a cylindrical mold.
Plastic bottle caps, often made from durable high-density polyethylene, represent a significant opportunity for implementing circular economy principles within the home. While these small items frequently end up in landfills due to challenges in mass collection, they can be given a new purpose through direct reuse. By joining them together, individuals can create sturdy containers suitable for various household needs, such as laundry baskets, small trash bins, or organizers for tools and other items.
According to technical guidelines from Mexico's Secretariat of Environment and Natural Resources (Semarnat), separating and utilizing plastic waste at the domestic level plays a vital role in reducing the demand for virgin raw materials. This DIY project offers a practical way to contribute to this goal. Successful creation of these repurposed containers requires approximately 100 to 200 clean plastic caps, a hot glue gun or industrial contact adhesive, and an old cylindrical container to serve as a temporary mold for shaping the new item.
The process begins with thorough cleaning and drying of all collected caps, using a mixture of water, neutral soap, and white vinegar to remove residues. This ensures optimal adhesion for the glue. Caps should then be sorted by size and thickness to maintain symmetry in the final structure, allowing for potential color pattern designs.
Assembly involves creating a base by gluing caps together in a circular pattern, expanding outwards concentrically to the desired diameter. Once the base is dry, the old cylindrical mold is placed upside down on it. Vertical rows of caps are then glued one above another, using the mold's contour as a guide for the walls' structure. After the glue cools, the mold is carefully removed, and a light layer of transparent sealant can be applied to fill any intermediate gaps, enhancing durability and ease of cleaning.
DistantNews Editorial
Originally published by El Universal in Spanish. Translated, summarized, and contextualized by our editorial team with added local perspective. Read our editorial standards.
More Stories


From Our Blog

What Press Freedom Means for the News You Read

What Gets Lost (and Found) When News Is Translated

The Critical Role of Diaspora Media in Global News

What Travellers Should Know About Countries with Restricted Press

A Digital Nomad's Guide to Following Local News
